Spock データベース
ホーム


Stack のインストール
macOS
$ curl -sSL https://get.haskellstack.org/ | sh
Windows
下記サイトよりインストーラーをダウンロード
Get Started with Haskell WindowsLinux
$ wget -qO- https://get.haskellstack.org/ | sh
詳しくは下記サイトを参照
Get started with Haskellプロジェクトの作成
よりシンプルな形にするために、プロジェクトを手動で作成します。
$ mkdir spock-web
$ cd spock-web
$ mkdir src
Cabal ファイルの作成
「spock-web」プロジェクト内に、次の内容の「spock-web.cabal」という ファイルを作ります。
name:                spock-web
version:             0.1.0.0
category:            Web
build-type:          Simple
cabal-version:       >=1.10

executable spock-web
  main-is:            Main.hs
  build-depends:      base >=4.10 && <4.11
                    , Spock
                    , lucid
                    , Spock-lucid
                    , text
  hs-source-dirs:     src
  default-language:   Haskell2010
Main.hs の作成
「spock-web」プロジェクト内の「src」ディレクトリ内に、
次の内容の「Main.hs」というファイルを作ります。
{-# LANGUAGE OverloadedStrings #-}
module Main where

import Web.Spock
import Web.Spock.Config
import Web.Spock.Lucid (lucid)
import Lucid

import Data.Semigroup ((<>))
import Control.Monad.IO.Class (liftIO)
import Control.Monad (forM_)
import Data.Text (Text)
import Data.IORef

data Note = Note { author :: Text, article :: Text }
newtype ServerState = ServerState { notes :: IORef [Note] }
type Server a = SpockM () () ServerState a

app :: Server ()
app = do
    get root $ do
        database <- getState >>= (liftIO . readIORef . notes)
        lucid $ do
            h3_ "記事"
            ol_ $ forM_ database $ \note -> li_ $ do
                small_ $ toHtml (author note)
                p_ $ small_ $ toHtml (article note)
            small_  "投稿者と記事を入力して投稿ボタンを押してください"
            form_ [method_ "post"] $ do
                label_ $ do
                    "投稿者 "
                    input_ [name_ "author"]
                br_ []
                label_ $ do
                    "記 事 "
                    textarea_ [rows_ "4", cols_ "40",
                        name_ "article"] ""
                    input_ [type_ "submit", value_ "投稿"]
    post root $ do
        author   <- param' "author"
        article  <- param' "article"
        notesRef <- notes <$> getState
        liftIO $ atomicModifyIORef' notesRef $ \notes ->
            (notes <> [Note author article], ())
        redirect "/"

main :: IO ()
main = do
    st  <- ServerState <$> newIORef []
    cfg <- defaultSpockCfg () PCNoDatabase st
    runSpock 8080 (spock cfg app)
ビルド
$ stack init
$ stack build
初回のビルドは「Spock」の開発環境と実行環境をインストールするため、 非常に時間がかかります。2回目からのビルドはすぐに終わります。
実行
$ stack exec spock-web
Spock is running on port 8080
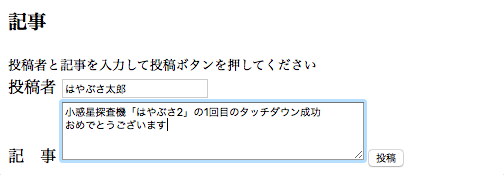
ブラウザを起動して「https://localhost:8080/」
へアクセスして、何か入力します。

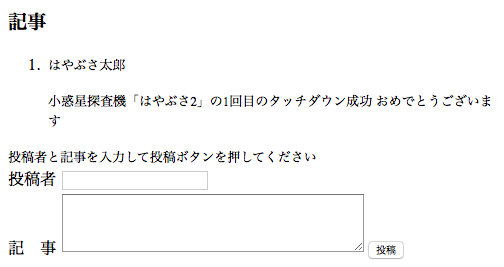
投稿」ボタンを押すと、次のようになります。

終了させるには、 ターミナルに、Controlキーと c と入力します。
^C
デプロイする場合のコード
デプロイする場合の「Main.hs」は次のようになります。 「spock-web.cabal」に変更はありません。
{-# LANGUAGE OverloadedStrings #-}
module Main where

import Web.Spock
import Web.Spock.Config
import Web.Spock.Lucid (lucid)
import Lucid

import Data.Semigroup ((<>))
import Control.Monad.IO.Class (liftIO)
import Control.Monad (forM_)
import Data.Text (Text)
import Data.IORef

import System.Environment
import Control.Monad

data Note = Note { author :: Text, article :: Text }
newtype ServerState = ServerState { notes :: IORef [Note] }
type Server a = SpockM () () ServerState a

app :: Server ()
app = do
    get root $ do
        database <- getState >>= (liftIO . readIORef . notes)
        lucid $ do
            h3_ "記事"
            ol_ $ forM_ database $ \note -> li_ $ do
                small_ $ toHtml (author note)
                p_ $ small_ $ toHtml (article note)
            small_  "投稿者と記事を入力して投稿ボタンを押してください"
            form_ [method_ "post"] $ do
                label_ $ do
                    "投稿者 "
                    input_ [name_ "author"]
                br_ []
                label_ $ do
                    "記 事 "
                    textarea_ [rows_ "4", cols_ "40",
                        name_ "article"] ""
                    input_ [type_ "submit", value_ "投稿"]
    post root $ do
        author   <- param' "author"
        article  <- param' "article"
        notesRef <- notes <$> getState
        liftIO $ atomicModifyIORef' notesRef $ \notes ->
            (notes <> [Note author article], ())
        redirect "/"

main :: IO ()
main = do
    port <- liftM read $ getEnv "PORT"
    st   <- ServerState <$> newIORef []
    cfg  <- defaultSpockCfg () PCNoDatabase st
    runSpock port (spock cfg app)
16918 visits
Posted: Feb. 16, 2019
Update: Feb. 23, 2019