wxHaskell レイアウト
この章では、フレーム(ウィンドウ)にウィジェット(GUI部品)をレイアウトする方法を説明します。
position
各ウィジェットの position 属性は、自分が配置されているコンテナー(フレームもコンテナーです)のx座標とy座標を指定して、自分が配置される位置を設定します。この、自分が配置されているコンテナーのことを parent (親) と呼びます。
コンテナーとは、内部に子ウィジェットを配置できるウィジェットです。多くのコンテナーは目に見えませんが、フレーム(ウィンドウ)は目に見えるコンテナーです。
absolute.hs
module Main where
import Graphics.UI.WX
import Graphics.UI.WXCore -- for frameCenter
main :: IO ()
main = start gui
gui :: IO ()
gui = do
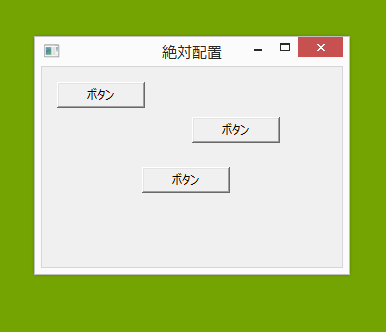
f <- frame [text := "絶対配置", clientSize := sz 300 200]
p <- panel f [clientSize := sz 1000 1000]
b1<- button p [text := "ボタン", position := pt 150 50]
b2<- button p [text := "ボタン", position := pt 15 15]
b3<- button p [text := "ボタン", position := pt 100 100]
frameCenter f
コード説明
p <- panel f [clientSize := sz 1000 1000]
複数個のウィジェットを配置するためのコンテナーとして、パネルを作っています。ただし、フレームは、子ウィジェットが一個の場合は、その子ウィジェットをフレーム全体に拡大しようとしますが、子ウィジェットが複数の場合は、指定された位置に正しく配置されます。したがってこの行のコードは無駄とも言えます。
また、パネルのサイズは、いくら大きくしても親ウィジェットのサイズより大きくなることはありません。ここでは万が一、内部の子ウィジェットが表示されなくなる事態を避けるため、大きめのサイズを与えています。
b1<- button p [text := "ボタン", position := pt 150 50]
ボタンの position 属性に値を与えて、表示される位置を姉弟します。位置は pt という関数によって ポイントオブジェクトに変換されてから、position 属性に設定されます。指定している位置は、親ウィジェットのx座標とy座標です。今回の場合は、パネルのx座礁とy座標になります。
先ほどの言いましたが、今回の場合は、パネルを作成せずに、フレームの中にボタンを作成しても構いません。
frameCenter f
frameCenterは、引数で指定したフレームを、スクリーンの中央に表示する関数です。frameCenterは、IO () を戻り値とし返しますので、gui 関数の最後には、
return IO () は記述していません。
ウィンドウを最大化して、レイアウトがどうなるか見てください。
layout
コンテナーが持つ layout 属性は、コンテナー内部の子ウィジェットを、次の3通りの方法で配置します。
- column 内部の子ウィジェットを列(縦)に配置します。
- row 内部の子ウィジェットを行(横)に配置します。
- grid 内部の子ウィジェットをマス目状に配置します。
このサンプルでは、column を使っています。
buttons.hs
module Main where
import Graphics.UI.WX
import Graphics.UI.WXCore
main :: IO ()
main = start gui
gui :: IO ()
gui = do
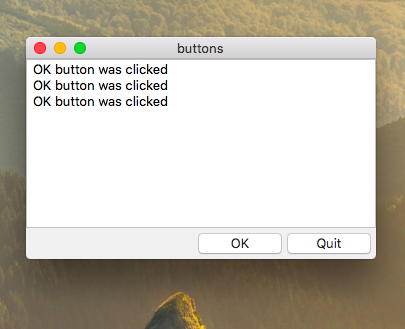
f <- frame [text := "buttons"]
p <- panel f []
t <- textCtrl p []
ok <- button p [text := "OK", on command :=
appendText t "OK button was clicked\n"]
quit <- button p [text := "Quit", on command := close f]
set f
[layout := container p $ column 0
[
fill (widget t),
margin 5 $ row 5
[hfill (label ""), widget ok, widget quit]
],
clientSize := sz 350 200
]
return ()
コード説明
[layout := container p1 $ column 0
column方式でレイアウトすることを指定しています。「0」という値は、内部に配置される子ウィジェット同士の上下の空白です。
[
    fill (widget tc),
    margin 5 $ row 5 [hfill (label ""), widget ok, widget quit]
],
column 関数は、レイアウト要素(子ウィジェット)のリスト [レイアウト] を引数に取ります。
(row 関数の場合も、レイアウト要素(子ウィジェット)のリスト [レイアウト] を引数に取ります)
fillは、ウィジェットを可能な限り拡大します。fillには次の3種類があります。
- hfill ウィジェットを横方向に可能な限り拡大する。
- vfill ウィジェットを縦方向に可能な限り拡大する。
- fill ウィジェットを縦と横の両方に可能な限り拡大する。
ウィンドウを最大化して、レイアウトがどうなるか見てください。
grid
gridは、ウィジェットをマス目状に配置します。
review.hs
module Main where
import Graphics.UI.WX
import Graphics.UI.WXCore
main :: IO ()
main = start gui
gui :: IO ()
gui = do
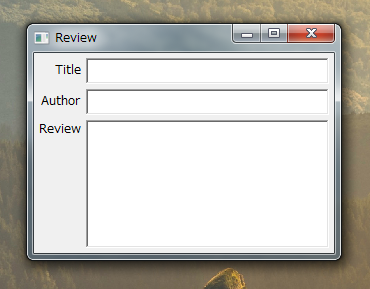
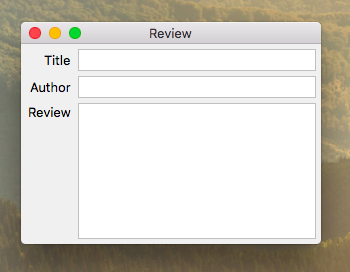
f <- frame [text := "Review"]
p <- panel f []
e1 <- entry p []
e2 <- entry p []
tc <- textCtrl p []
st1 <- staticText p [text := "Title"]
st2 <- staticText p [text := "Author"]
st3 <- staticText p [text := "Review"]
set f
[layout := margin 5 $ container p $ grid 5 5
[
[alignRight (widget st1), hfill (widget e1)],
[alignRight (widget st2), hfill (widget e2)],
[floatTopRight (widget st3), fill (widget tc)]
],
clientSize := sz 300 200
]
return ()
コード説明
[
    [alignRight (widget st1), hfill (widget e1)],
    [alignRight (widget st2), hfill (widget e2)],
    [floatTopRight (widget st3), fill (widget tc)]
],
grid 関数は、レイアウト要素(子ウィジェット)のリストのリスト [[レイアウト]] を引数に取ります。
column の場合より、階層が一つ深くなっていいるのがわかりますでしょうか?
alignRight は引数のレイアウト要素を右側に配置します。
floatTopRightについては、次の「Floating alignment]の項で説明しています。
ウィンドウを最大化して、レイアウトがどうなるか見てください。
Floating alignment
layout 属性には、Floating alignment という便利な関数があります。
Floating alignment には、次のような種類があり、指定したウィジェットを、そのウィジェットが配置できる範囲を可能な限り拡大して、指定の位置にウィジェットを配置します。
|
例えば、floatBottomRight は、ウィジェットを、そのウィジェットが配置できる範囲を可能な限り拡大して、右下に配置します。一方、alignBottomRightとした場合は、ウィジェットを右下に配置しますが、配置できる範囲を広げようとはしません。
(floatCentre は、floatCenter とも書けます)
bottomright.hs
module Main where

import Graphics.UI.WX
import Graphics.UI.WXCore

main :: IO ()
main = start gui

gui:: IO ()
gui = do
    f <- frame [text := "右下"]
    p <- panel f []
    b <- button p [text := "終了", on command := close f]
    set f
        [layout := margin 15 $ container p $
            floatBottomRight (widget b),
         clientSize := sz 230 150
        ]
    return ()
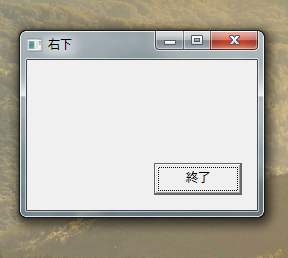
ウィンドウを最大化して、レイアウトがどうなるか見てください。
boxed
boxed は、複数のウィジェットを四角い枠の中に入れて、視覚的にグループ化するコンテナーです。
boxed.hs
module Main where

import Graphics.UI.WX

main :: IO ()
main = start gui

gui :: IO ()
gui = do
    f       <- frame [text := "boxed"]
    p       <- panel f []
    b1      <- button p [text := "button1"]
    b2      <- button p [text := "button2"]
    b3      <- button p [text := "button3"]
    about   <- button p [text := "about", on command := infoDialog f "Aoubt boxed"
                    "This is a information dialog"]
    quit    <- button p [text := "quit", on command := close f]

    set f   [defaultButton := about
            ,layout :=  container p $
                        margin 10 $
                        column 5 [floatCenter (boxed "buttons" (row 5
                        [widget b1
                        ,widget b2
                        ,widget b3
                        ,widget about
                        ,widget quit]))]
            ]
    return ()
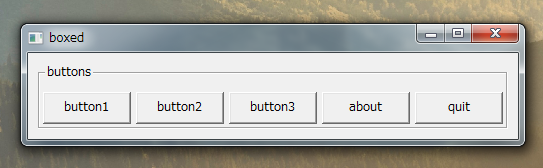
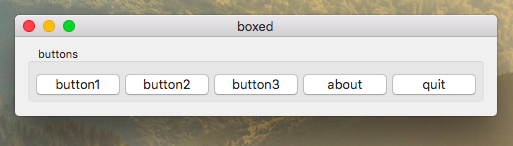
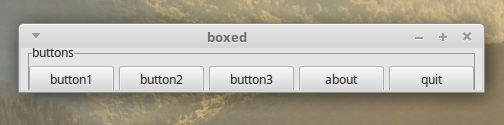
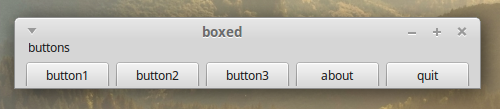
Linux Mint 17では、枠線は表示されないみたいです。